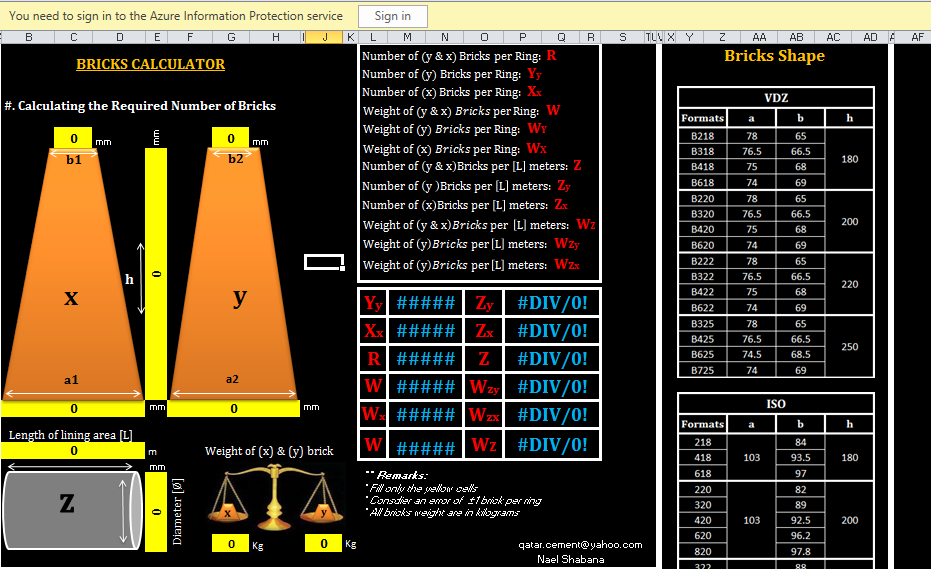
This page has moved. The interactive Refractory Brick Calculator is now available at cementequipment.org/calculators/brick-calculator/ — free to use with instant results, ISO brick formats, and print support.
General information (lining chart, lining method, mixing ratio, packing list, working instruction ..)
Technical meeting with bricklayers / contractors
Inspection of kiln shell in repair section
Safety instructions
Even after passing the most rigourous safety instructions keep always your eyes open when entering and working inside the kiln!
Lining methods
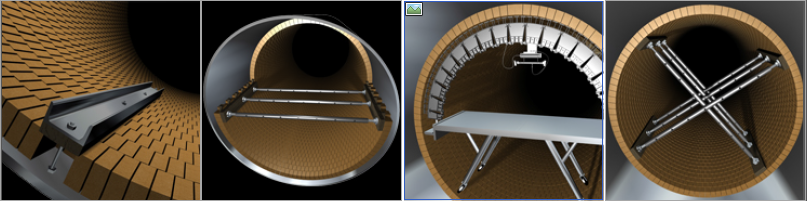
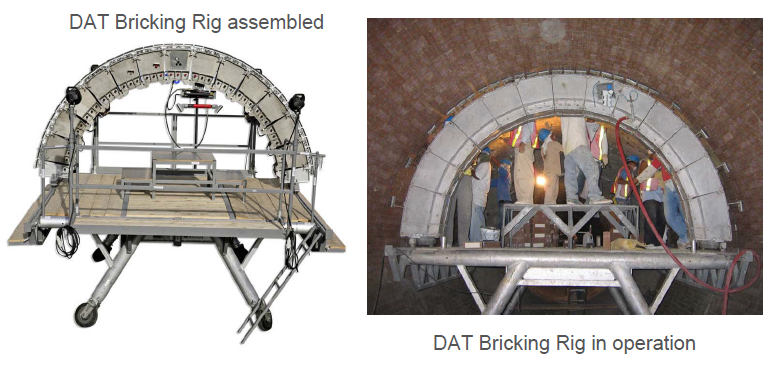
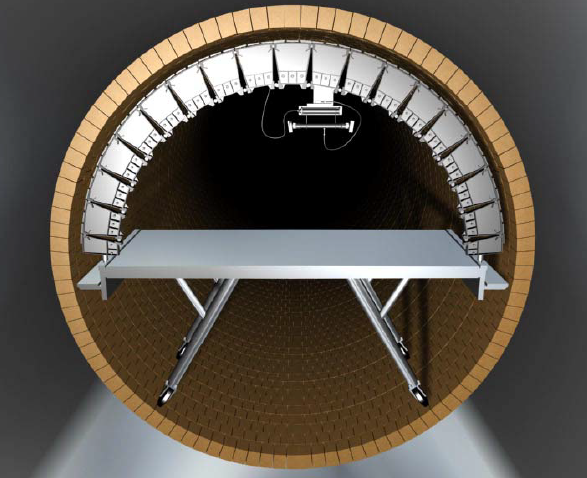
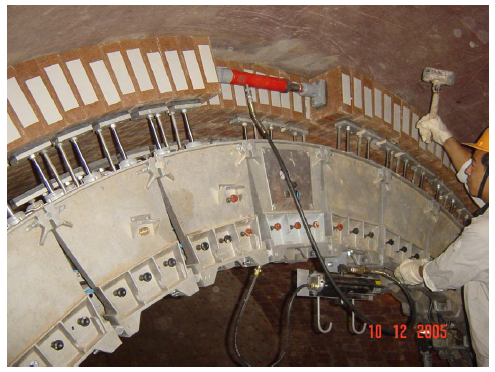
DAT Bricking Rig
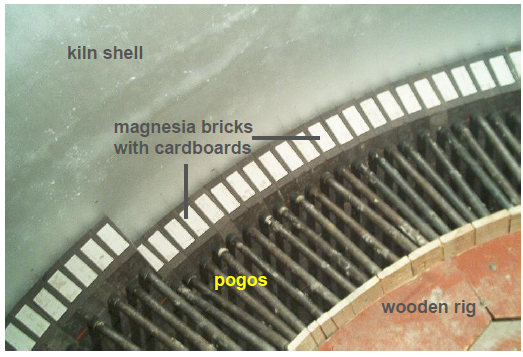
Pogo Sticks
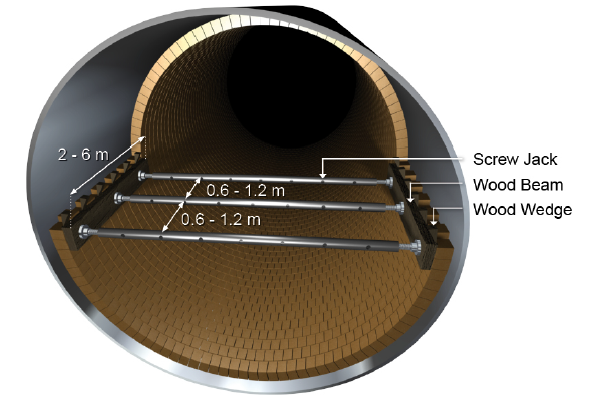
Jacks
Glue
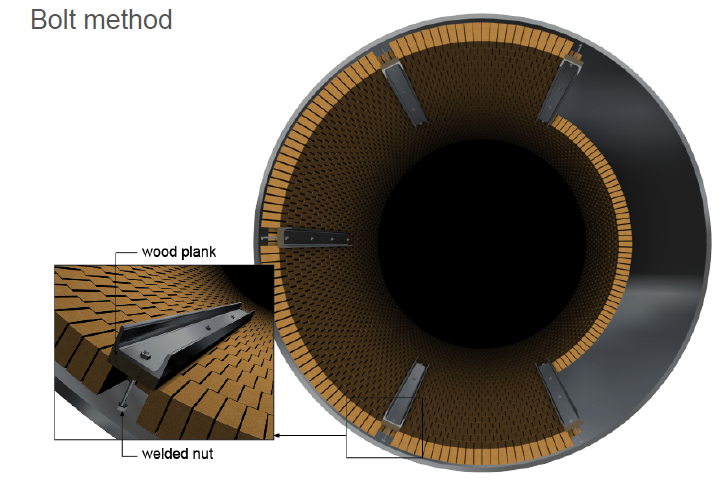
Bolts
Lining speed
DAT Bricking Rig
Safest lining method, adaptable for different kiln diameters, no turning of kiln
Lining with a DAT Bricking Rig
Pogo Sticks Low-cost method where „pogo sticks“ support the lining. No pressurized air. No turning of kiln, wooden rig is not adaptable for different kiln diameters.
Screw Jacks: Lining sequence
Advantages of screw jack method: Rapid set-up, low-cost equipment with low maintenance costs. Recommended for patchwork, small diameter kilns (Ø <4 m) and short sections (<4 running meters)
Glue method
Bolt method
Both the glue and the bolt method require a skilled workforce to avoid safety risks. For gluing, kiln shell must be clean and dry; low temperatures (<5°C) will retard hardening of the glue – follow manufacturer´s instruction! With gluing and bolting the kiln inner space is not obstructed by bricking rigs, jacks etc. Kiln needs to be turned for completing the rings. Lining Speed
Safety first. Then quality. Then speed The often cited rule of thumb: Kilns with Ø 4m >>> 5 meters per shift (10 meters/day) Kilns with Ø 5m >>> 4 meters per shift (8 meters/day) must be seen as a minimum today: with detailed planning, sufficient personnel and a skilled workforce 16-20 meters/day will be lined without incurring quality
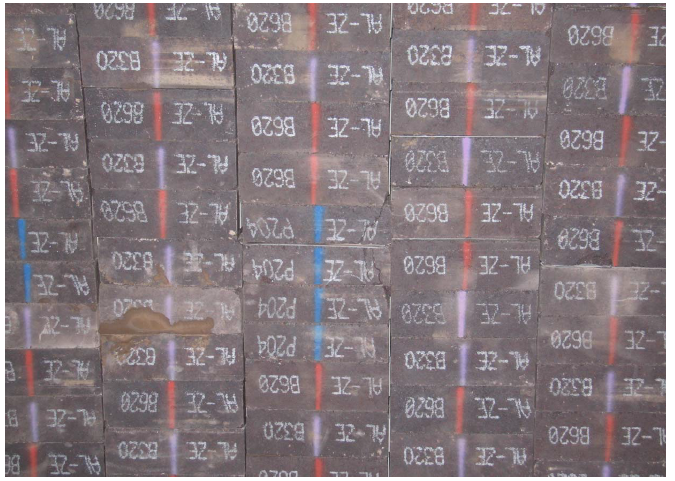
Bricks and mortar
Basic and alumina bricks
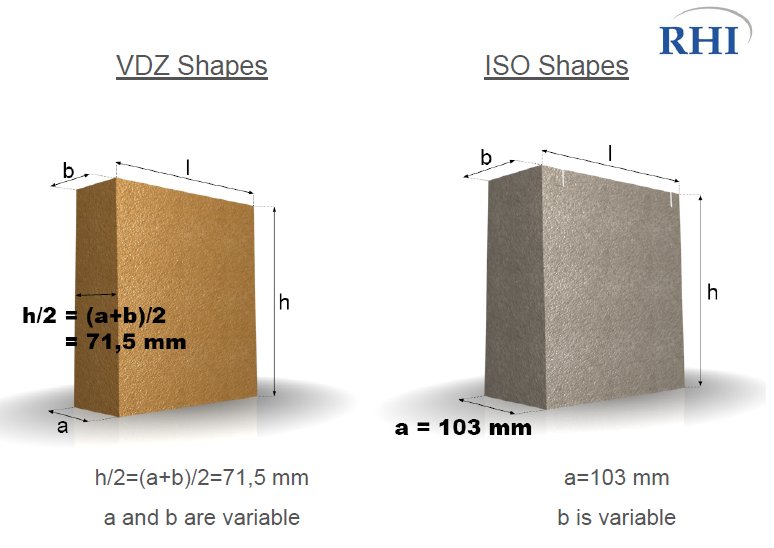
VDZ vs. ISO shapes
Clench vs. mortar lining
Metal sheets attached
Cardboards
Brick Shapes: VDZ vs. ISO General recommendation: Use VDZ shapes for basic lining and ISO shapes for alumina bricks
Note: For very large diameter kilns (Ø > 5.6m) ISO shapes are recommended also for basic bricks, due to the greater taper, which increases lining stability during kiln start-up . VDZ linings have approx. 30% more brick joints which provides increased flexibility and thermal shock resistance to the rings. Basic bricks have cardboard attached to compensate for higher thermal expansion. Alumina bricks are usually layed with mortar to adjust greater dimensional tolerances of alumina brick.
Cardboards (basic bricks) Attached on axial joint (thickness 1.5 mm). Burn-out of cardboard is faster than thermal expansion of bricks, so great care must be taken when turning the kiln during heat-up. Metal sheets (magnesia chromite bricks) Attached on radial joint of each brick (thickness 0.7 mm). Starts to soften at approx. 600°C and to oxidise at >1000°C thus forming a ceramic bond between bricks. Must not be confounded with key shims which are driven in to tighten the rings. Mortar lining Mortar on the radial joints helps to even out surface irregularities of bricks and to distribute stress evenly over the whole area. It is therefore recommended for kiln sections with increased mechanical instability or ovality (e.g. tyres, kiln drive, outlet). Thickness of mortar joint should not exceed 1 mm. Clench lining
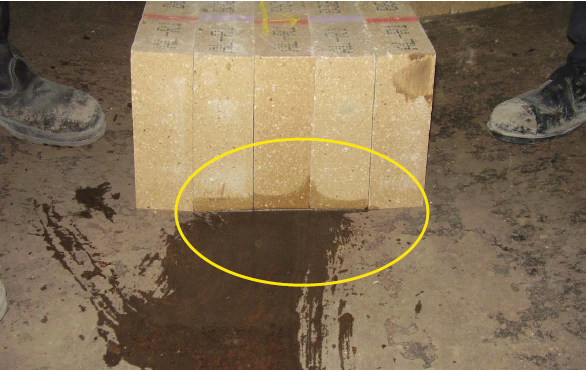
For simplicity and speed of installation most basic bricks are clench lined, i.e. without mortar or metal sheets.
Bricking procedure
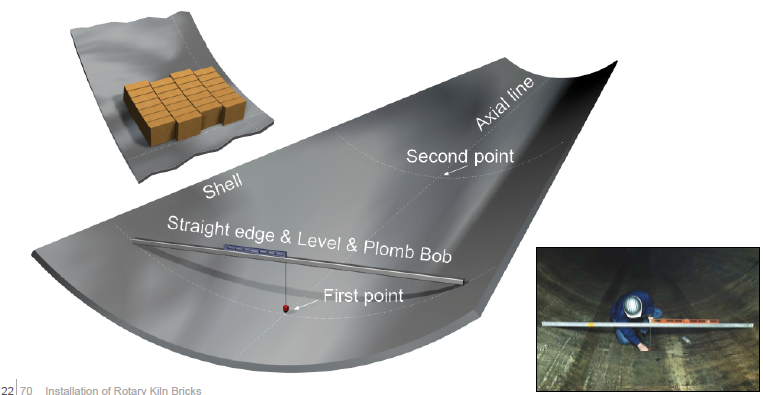
Marking the axial line and radial lines (e.g., by Radialign)
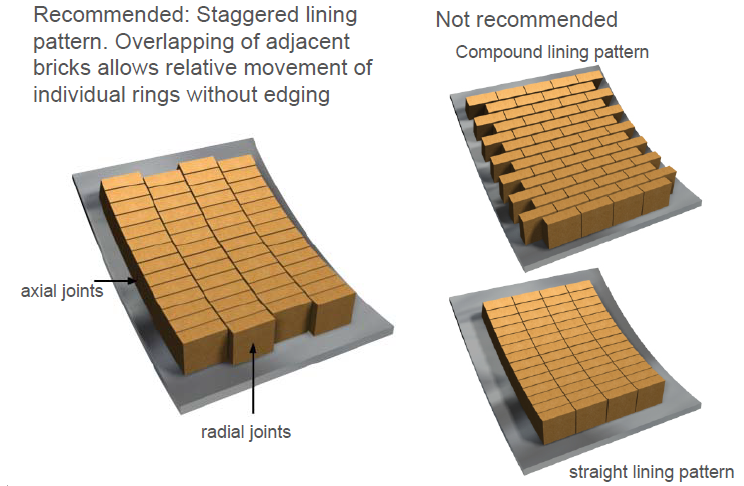
Staggered vs straight rings
Ring closure (key bricks, position of key bricks, jacking pressure …)
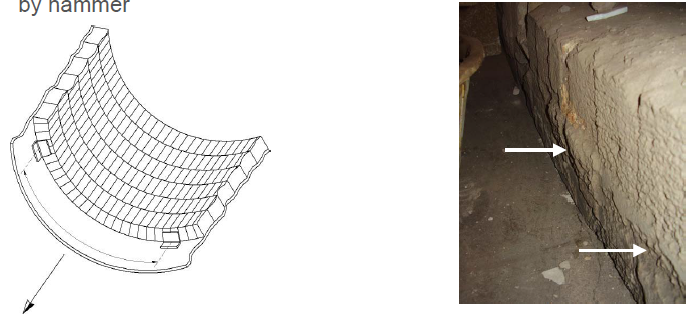
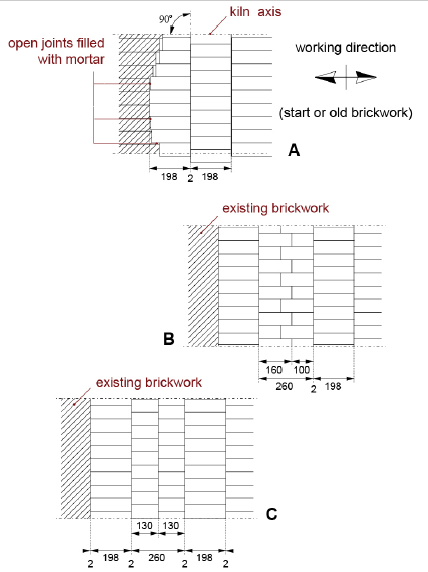
Fit to old brickwork (L-shapes, position of cut / standard size bricks …)
Re-shimming of old brickwork
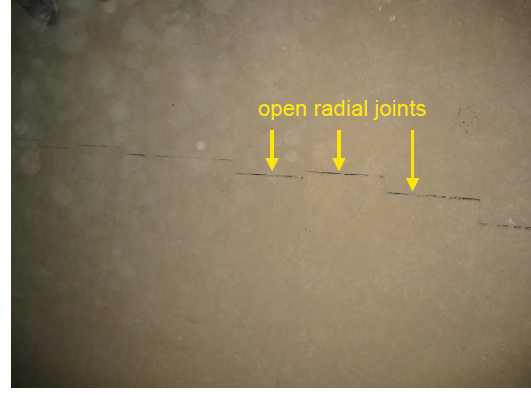
Open axial joints in old brickwork – what is acceptable?
Preparing for warming-up
Marking the axial line and radial lines
Fixing the axial and radial lines by (a) level & plumb bob or (b) by laser goniometer
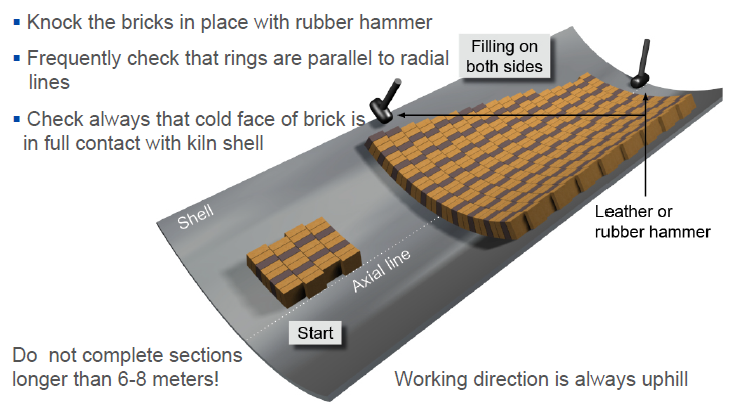
Brick laying
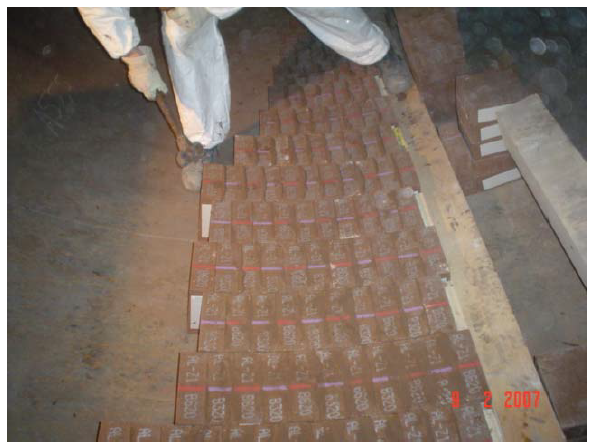
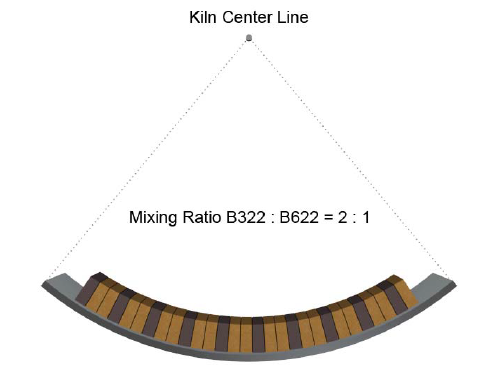
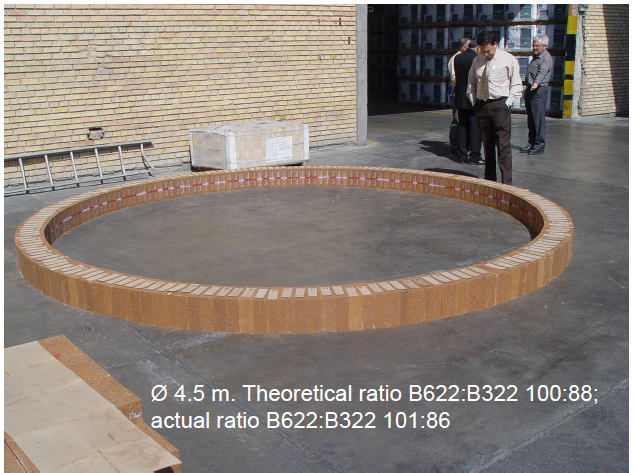
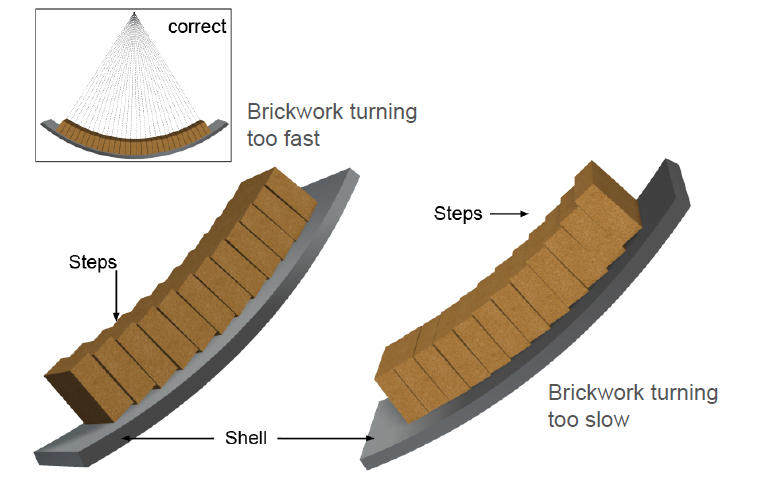
Start rings according to the indicated mixing ratio
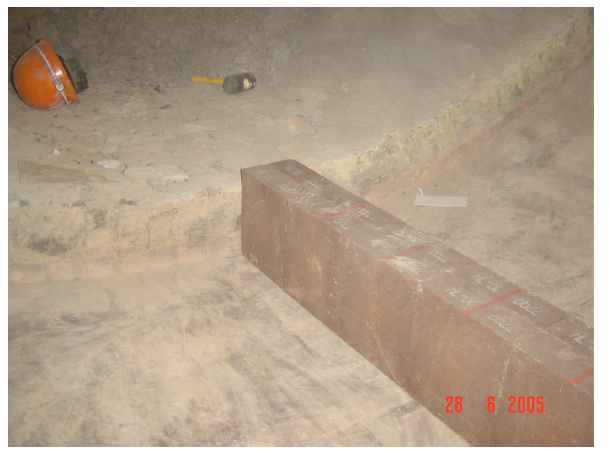
Knock the bricks in place with rubber hammer
Frequently check that rings are parallel to radial lines
Check always that cold face of brick is in full contact with kiln shell
Recommended: Staggered lining
Tolerated: Straight lining
Two Taper System
Compare theoretical and actual mixing ratio in every ring, document deviations! Checking the mixing ratio
Ring Closure : Take great care to close every ring correctly! (1) Tighten bricks with hydraulic jack. Maximum jack pressure should not exceed 35-40 N/mm2 (~1/2 brick cold crushing strength). During jacking knock bricks with rubber hammer
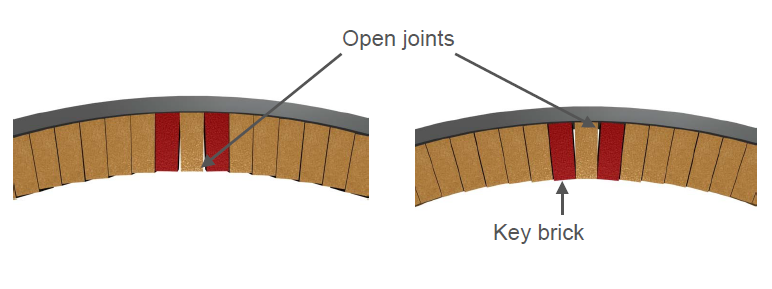
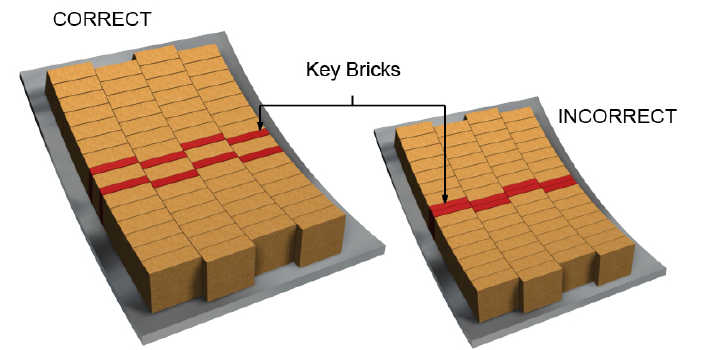
(2) Combine standard shapes and key bricks to obtain a straight joint of 4-6 mm thickness. Never cut standard or key shapes parallel to radial joint to fit the gap! Avoid V- or Λ-shaped joints: Brickwork will always be loose, even after shimming
(3) Inserting the last brick: In case the brick combination is perfect without open joint, never knock with hammer onto the brick!
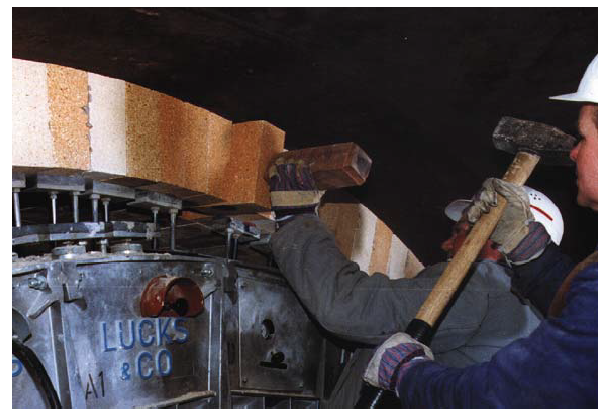
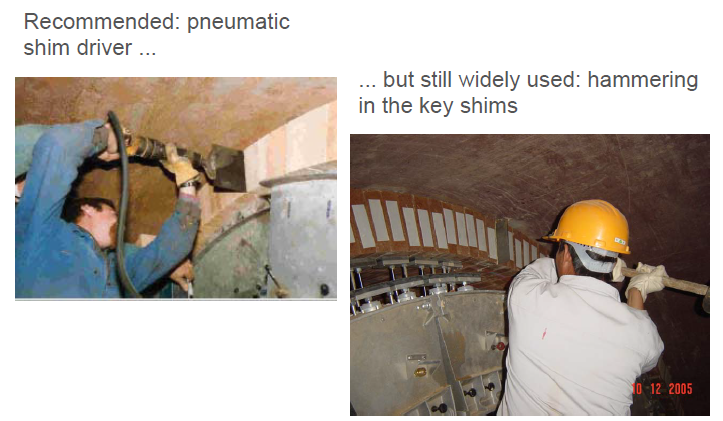
(4) Staggered position of key bricks and key shims. Do not use more than 2-3 shims per rings. Recommended thickness 2 mm. Use pneumatic shim driver if available. Without shim driver, 3 mm thick shims are acceptable. Phased (bevelled) shims greatly facilitate driving in. Drive in not more than one shim per joint.
What´s wrong?
(5) After releasing the bricking rig (or srew jacks), rings must remain in contact with kiln shell
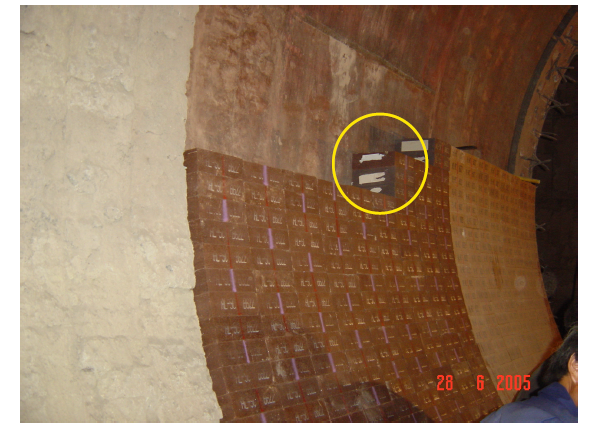
New lining meets old lining After breaking out the bricks, the old lining remaining in the kiln has to be fixed by angle irons welded onto the kiln shell. Remove concretions on axial joint of old lining (arrow) by grinding tools, not by hammer
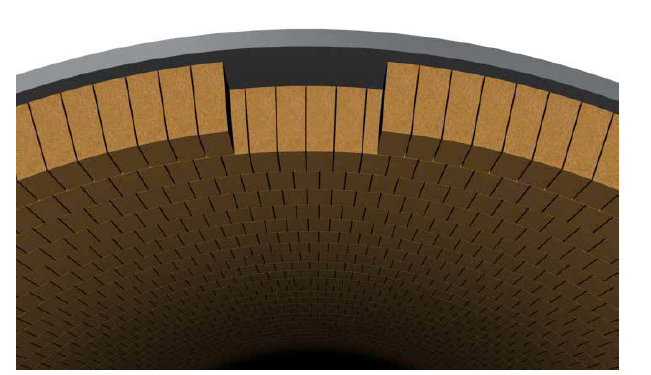
Whenever possible do not cut the first ring, install cut bricks between full rings. Use long bricks (L shapes) to fill gap of 200-300 mm. With standard shape bricks, never use bricks <100 mm. Compound lining enhances stability. Document position of cut rings.
Do not cut magnesia bricks with water! Wet magnesia bricks will probably hydrate during kiln heat-up
Re-shim open radial joints in old brickwork to avoid any risk of brick slip during kin heat up.
Open axial joints in old brickwork: fill gaps up to 60 mm wide with ceramic blanket. If gap is >60 mm, remove adjacent ring and fill in cut long shapes.
Preparing for kiln heat-up
After closing the last ring and removing the bricking rig, screw jacks etc., turn the kiln at lowest speed by 180° and check the lining for open joints, sagged rings. If necessary, tighten rings with additional key shims. Compare theoretical and actual number/shapes of installed bricks. Document deviations from theoretical number. In case of nose ring castables, follow drying instructions of supplier.
Specific lining situations
Deformed kiln shell
Correcting rings in radial direction
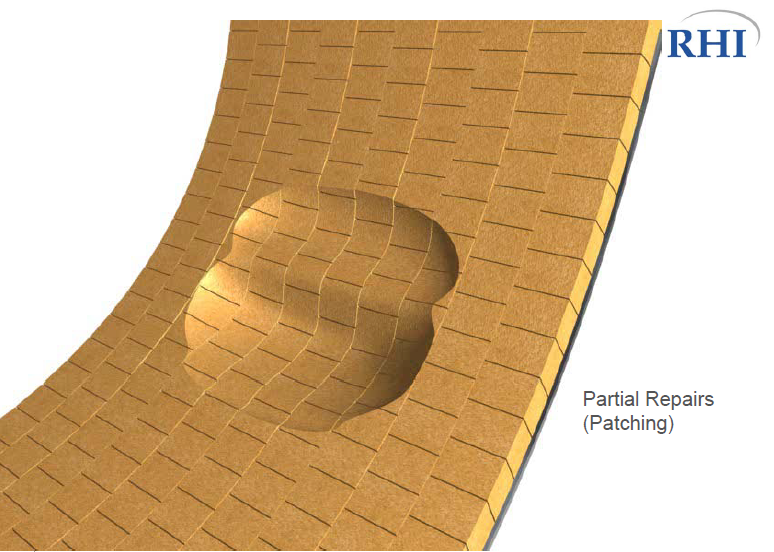
Partial repairs (patching)
Retaining rings
Veitsch-Magotteaux retaining ring system (VMRRS)
Nose ring
Cone sections
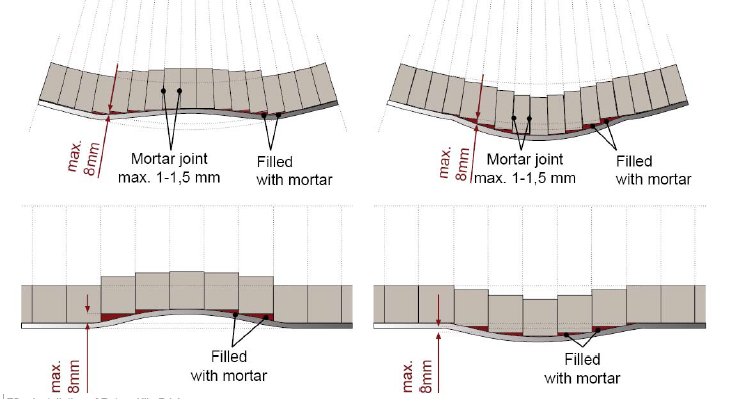
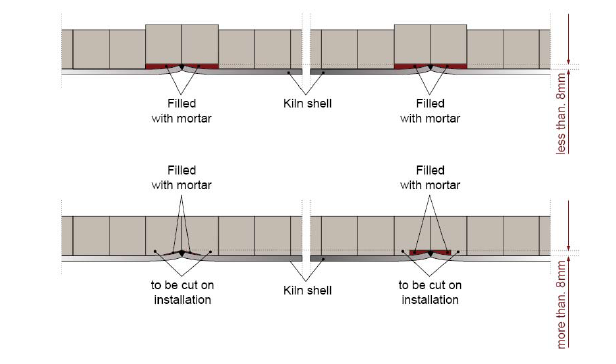
Deformed kiln shell
Always a challenge for bricklayers. Level out deformed shell with mortar or castable. If necessary, cut bricks to fit best onto the kiln shell.
Not recommended: To fill V-shaped joints with mortar or castable. Crushing strength of thin layers of mortar and castables is much lower than strength of bricks
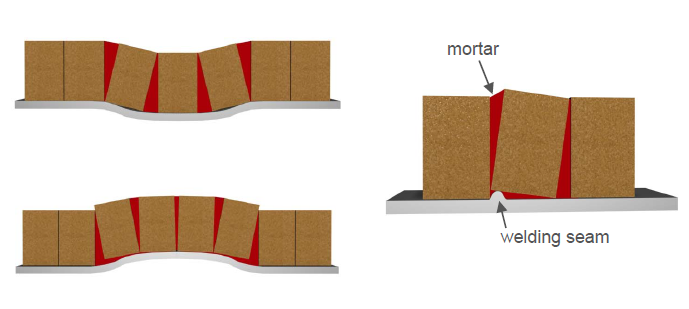
Bricks over welding seams
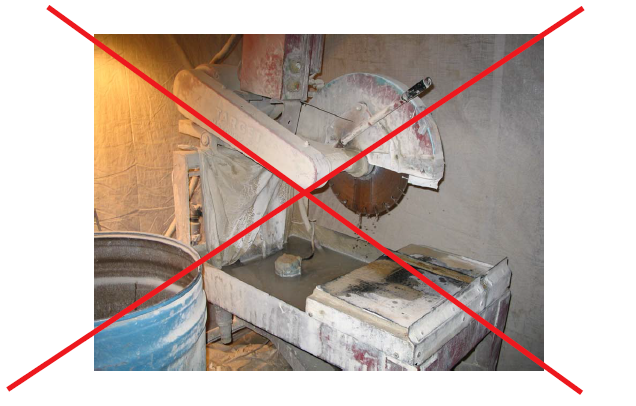
Never prepare bricks by chipping with hammer – if necessary use brick saw
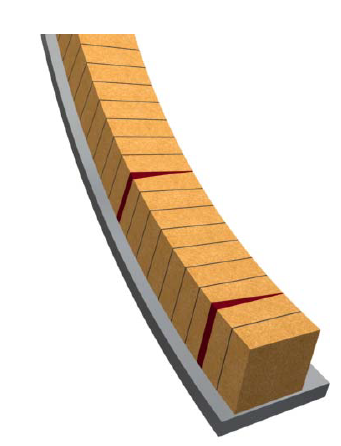
Correcting rings in radial direction Use mortar or ceramic paper of max. 2 mm thickness. Steel shims are NOT recommended. Removing of expansion cardboard is NOT recommended.
NOT recommended: To remove cardboards
Retaining Rings
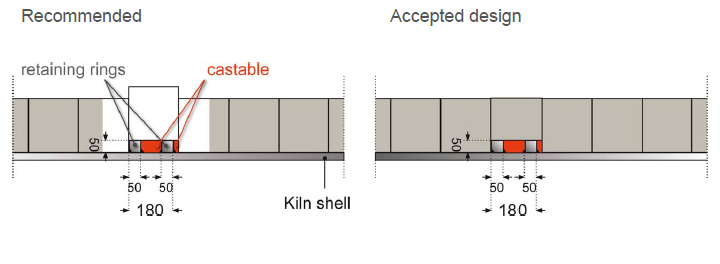
For simplicity, two retaining rings (50 x 50 mm) are recommended
Use standard shapes if possible, avoid cutting. A 50 mm step in the outlet section usually does not obstruct clinker flow Accepted: Cut bricks at the outlet side. Always cut basic bricks dry! Accepted: To avoid brick cutting and in case an existing retaining ring is not removed, it can be covered by castable. Insert plastic between brick and castable!
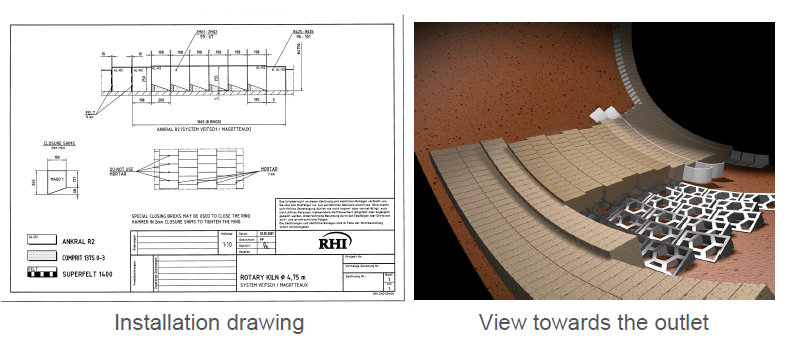
The combination of retaining ring and castable (with metallic anchors) provides very high stability. Spiralling in front of the retaining ring is made more difficult with a compound lining of standard bricks and 300 mm long bricks For severe lining thrust, RHI has developed a special retaining system: the Veitsch Magotteaux System. It consists of honeycomb cast iron segments supplied by Magotteaux, Belgium, and special shaped ANKRAL R2 bricks.
Cone section Recommended: special shapes to fit as tight as possible to the kiln shell. Use as little mortar as possible in radial joint –brickwork in cone section should not be compressed Not recommended: standard shapes plus mortar and cut bricks in the lower and upper end of cone
Consult drawing for position of axial expansion joints
Kiln start-up
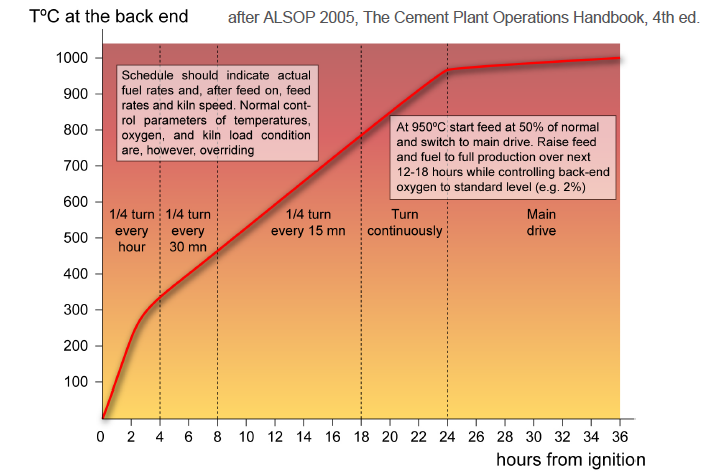
Warming-up curve
Burn-out of cardboards
Re-shimming in case of warm-up interruptions
Shut-down procedure
Warming-up curve
Burn-out of cardboard between 200-800°C is more rapid than thermal expansion of magnesia bricks, so turn kiln at lowest speed. Monitor temperature difference between tyre and kiln shell (<160°C) and tyre migration. In case heating-up has to be interrupted and kiln must be cooled down, check lining stability before relighting the kiln. If necessary, re-shim loose sections of the lining. This may happen with a bad installation ….
Shut-down curve should follow heat-up curve in the reverse sense. Entering the kiln before 24 hours after shut-off will prove difficult because of red hot coating firmly attached to lining. Breaking down and emptying the coating during cool-down by turning the kiln at highest speed is definitely NOT recommended. It may twist the lining, crush the bricks at the retaining rings and deform the outlet segments.
Storage
General storage instructions
Shelf life (basic bricks, aluminous bricks, mortar)
Hydration of magnesia bricks
Wet bricks, wet lining sections
Check materials upon arrival for transport damages. Store refractory materials under roof in ventilated, dry rooms and protected against rain, splashing water, snow etc. from all sides. Under tropical conditions, open plastic shrink wrapping to avoid condensation of water within the pallet. Maximum shelf height
Maximum shelf life Fireclay and alumina bricks are not susceptible to hydration and can be stored indefinitely. Mortar should not be stored at customer´s warehouse for more than 12 months. Magnesia bricks are susceptible to hydrate, especially under tropical conditions and when made from high purity, synthetic magnesia. Hydration of magnesia bricks
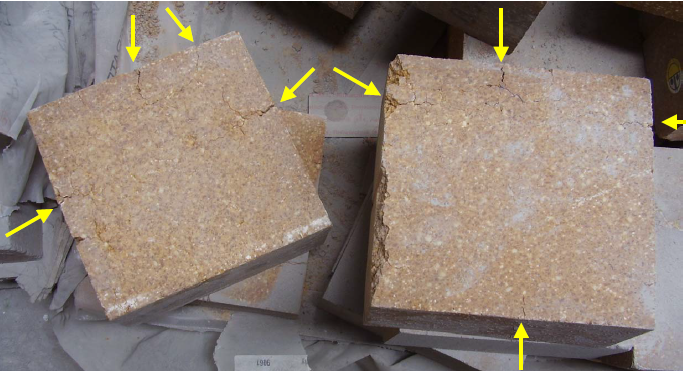
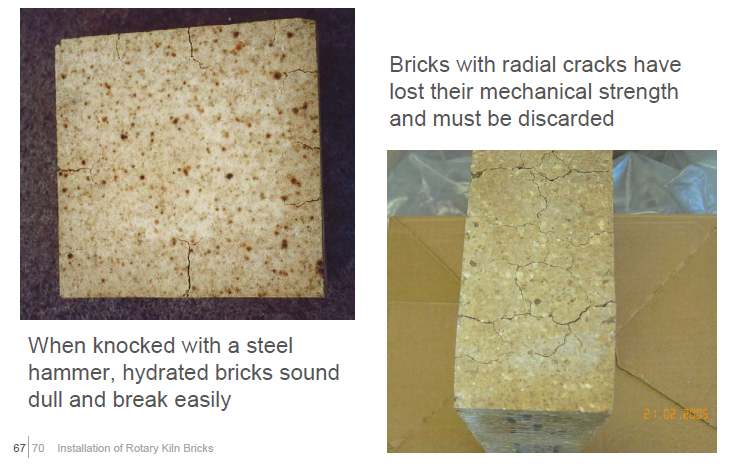
Radial cracks (arrows) are an inequivocal sign of hydration; hydrated bricks cannot be used anymore.
Hydration of magnesia bricks
Wet bricks and wet lining sections Magnesia bricks which have become wet must be stacked openly and ventilated at ambient air temperatures until dried completely. Do not use hot air, do not expose wet bricks to the heat radiated from the kiln shell. After drying, check bricks carefully for radial cracks.New lining sections which have become wet must be removed and replaced by dry bricks. Wet bricks must be removed!
Installation report – highly recommended!
Basic data (start and finish of works, rings and brick grades installed, position of brick grades, lining method etc.)
Theoretical vs. actual mixing ratio per ring, number of key shims per ring
Need organized cement references instead of searching article by article?
CEMENTEQUIPMENT.ORG offers a professional technical package built for engineers, plant teams, buyers, and decision-makers. The reference value is positioned at more than $50,000, while the package is offered at about $249.
If you are researching this topic for a live plant problem, project, or supplier discussion, use the package for depth or request direct commercial support.
2 thoughts on “Brick Calculator and Installation Procedures”
vikas kumar
hello, I need urgent help regarding the calculation of refractory bricks on steel ladle with Upper diameter is 2080mm, Inner diameter is 1800mm & Hight of the ladle is 2680mm. Bricks dimenssion of lining is 230mm*115mm*50mm (LWH)


hello,
I need urgent help regarding the calculation of refractory bricks on steel ladle with Upper diameter is 2080mm, Inner diameter is 1800mm & Hight of the ladle is 2680mm.
Bricks dimenssion of lining is 230mm*115mm*50mm (LWH)
Give me documenta for calculatmor briquetas